Giddh Docs
Invoice Management

Invoice Management

All about invoices from generating/ editing various vouchers like sales, cash, Cr., Dr. notes, to adjusting receipts and exporting PDFs

All about invoices from generating/ editing various vouchers like sales, cash, Cr., Dr. notes, to adjusting receipts and exporting PDFs

A Cash Invoice is a type of sales invoice that is issued when the customer makes an immediate payment — typically in cash or through a bank payment (like UPI, card, or cheque) — at the time of the transaction.

Unlike a credit invoice (where payment is due later), a cash invoice records the sale and the payment simultaneously.

🔍 Step-by-Step Process

Step 1: Open the Cash Invoice Screen

Press Ctrl + G (or Cmd + G on Mac).

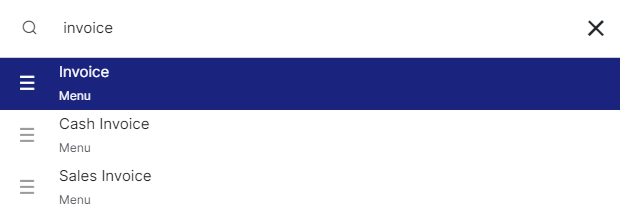
Type "Cash Invoice" in the search bar and select it from the list to open the invoice creation page.

OR

Please refer to this link for the Cash Invoice page:

https://books.giddh.com/pages/vouchers/cash/create

Step 2: Enter Customer Details

  1. Customer Name: Enter the name of the customer. If it’s a walk-in, you may use “Cash Customer”.

  2. State: Select the customer’s state to ensure proper GST tax calculation.

  3. You can also add:

    • Customer email or mobile number (for sending invoices)

    • Billing and shipping addresses (optional but useful)

frame_1 (1).webp

Step 3: Add Items or Services

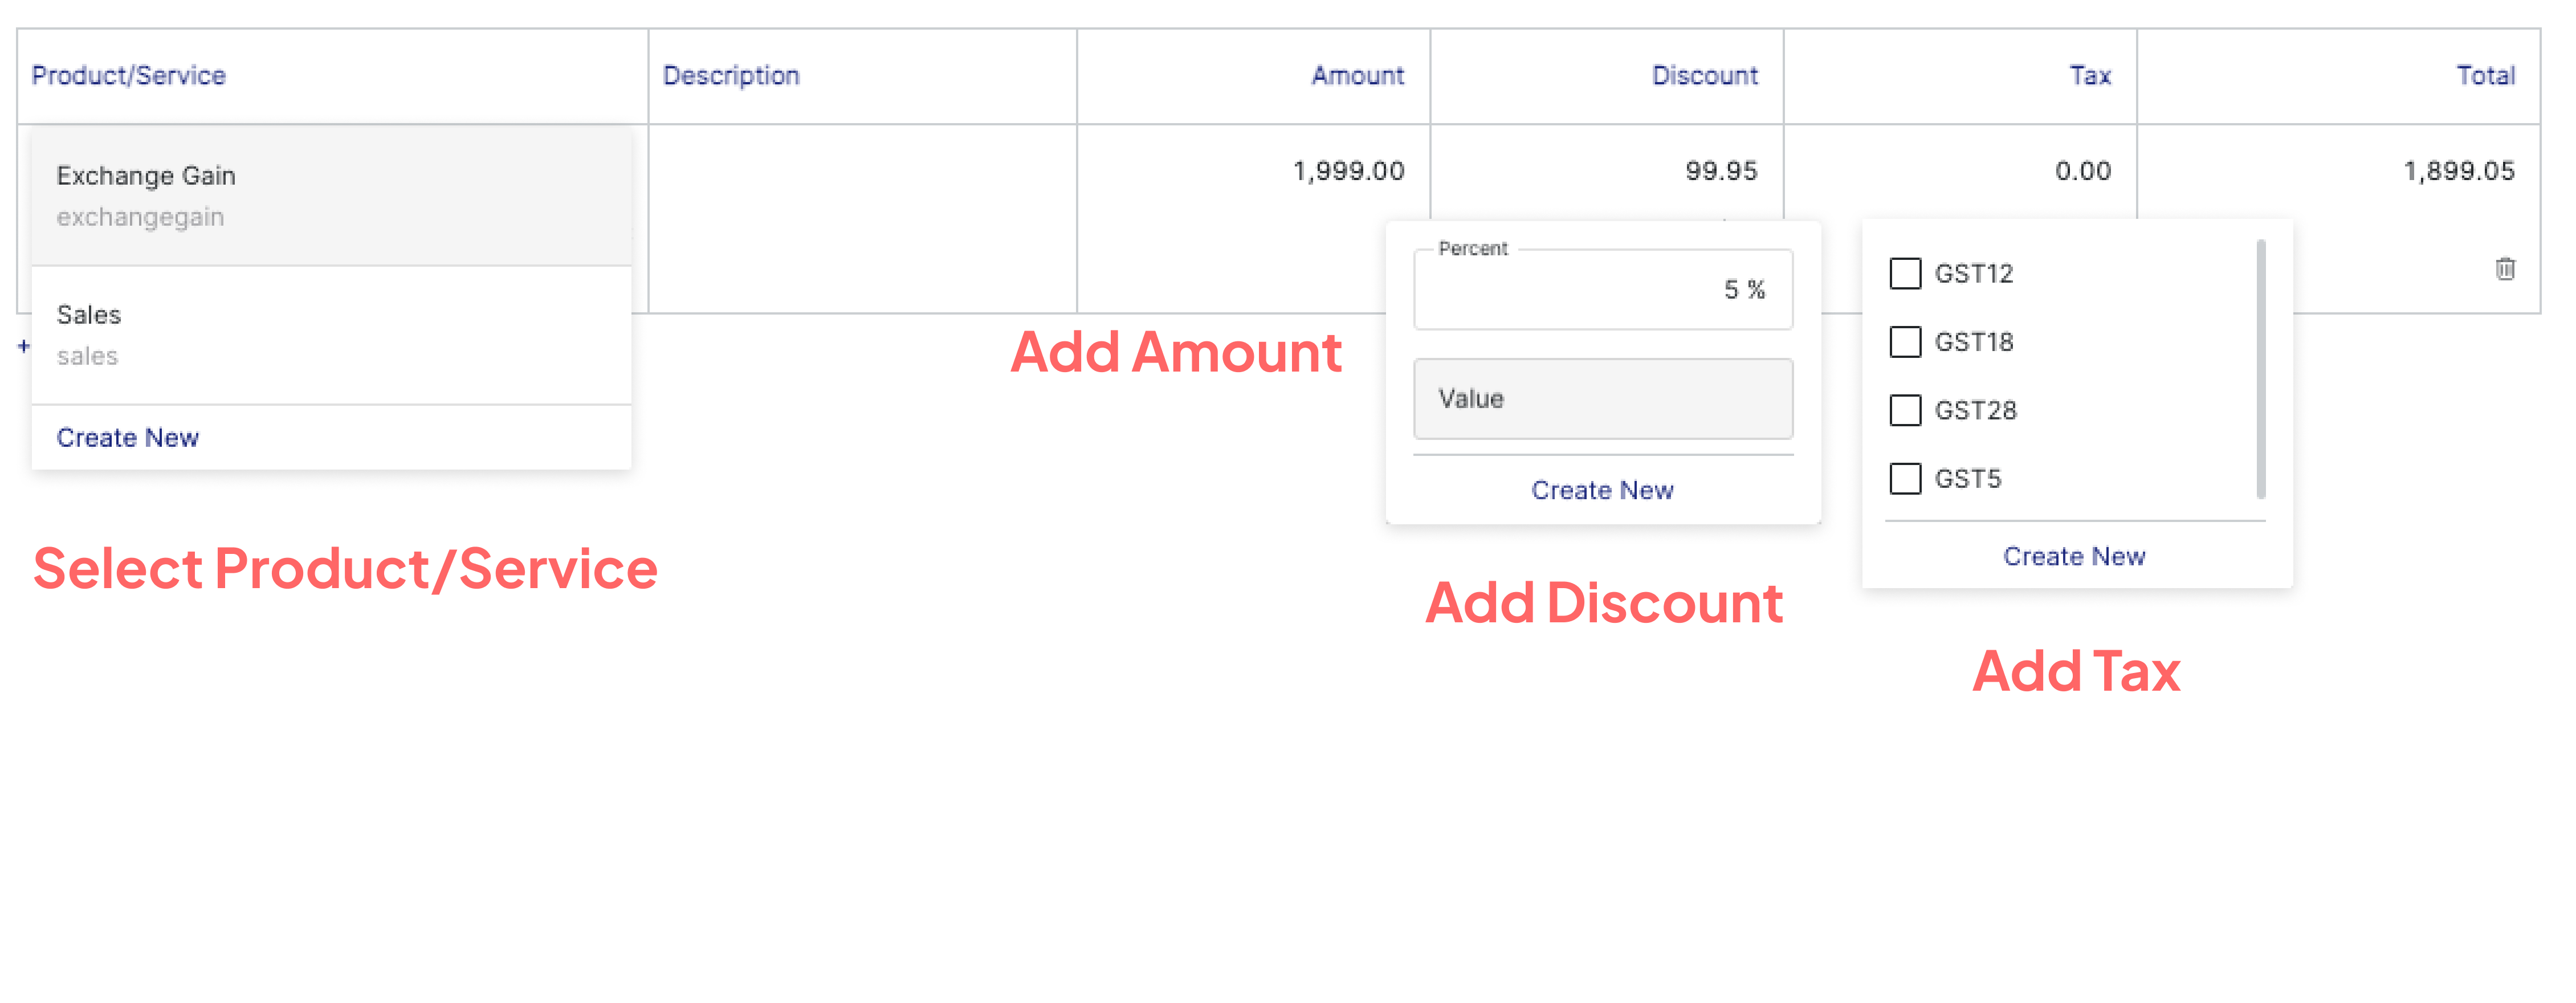
In the Product/Service section, you need to fill in the details of the goods or services being sold. This information forms the core of your invoice and affects the total billing amount, inventory, and tax calculations.

Fields to Fill:

  1. Item Name: Select the product or service from the drop-down list. These should already be added to your Giddh inventory master.

  2. Rate: Provide the per-unit rate for the selected item. The system will automatically multiply it by the quantity to calculate the item total.

  3. Discount: Discount refers to the reduction applied to the item price before tax calculation.

    Giddh supports two types of discounts:

    Fixed Discount – A specific amount is reduced (e.g., ₹100 off).

    Percentage Discount – A percentage is deducted from the item’s rate (e.g., 10% off).

  4. Applicable Taxes: If a tax rate is predefined in the product master, it will auto-fill here (e.g., GST). You can edit it if needed, based on the customer's state and tax applicability.

frame_2.webp


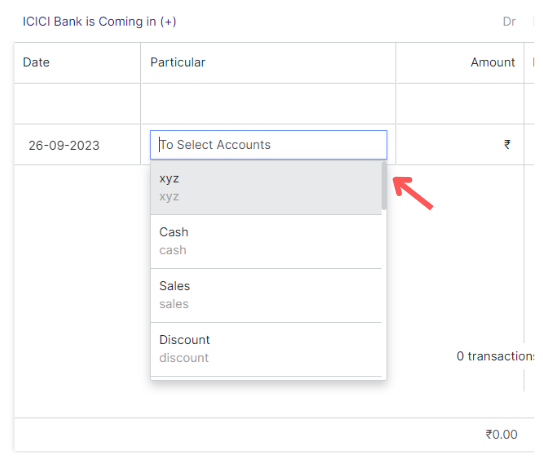
Step 4: Select Payment Account

  • Under the “Select Account” section:

  • Choose Cash if the customer is paying in cash.

  • Choose the appropriate Bank Account if the payment is received via cheque, UPI, or net banking.

  • This ensures the entry is directly recorded in the respective ledger.

frame_3.webp

Step 5: Review & Generate Invoice

Before finalizing the invoice, it’s essential to review all the details to ensure accuracy and compliance. This step ensures that your sales data, tax records, and customer information are correctly captured in your accounting books.

Things to Review Before Generating the Invoice:

  1. Customer Details: Confirm the customer name, billing address, and state, as these determine tax calculation.

  2. Date: Verify the invoice date — this affects your tax period, reporting, and ledger entries.

  3. Item Details: Ensure the correct items, quantities, rates, and discounts (if any) are applied.

  4. Tax & Discount :Before generating the invoice, it's important to thoroughly review the Tax and Discount section to ensure accuracy and compliance.

  5. Payment Mode: Confirm that Cash or the appropriate Bank account is selected under the payment section.

  6. Total Amount: Verify the total invoice value including all taxes and charges.

Generate and Finalize the Invoice

  • Once all the information is reviewed: Click on “Generate Invoice”.

  • You will be redirected to the invoice preview screen.

Please refer to this video to learn how to create a Cash Invoice.

How to generate cash invoice
CreateCashInvoiceGenerateCashInvoiceNewCashInvoiceCashInvoice
Jul 5, 2025

Creating a sales invoice in Giddh is simple and helps track your revenue accurately. Follow the steps below to generate an invoice for your sales transactions.

🔐 Step 1: Log in and Use Search for Quick Access

Log in with your registered email ID and password.

Once logged in Giddh, you can quickly search for any module or feature using:

Ctrl + G for Windows or Cmd + G for Mac

Type "Sales Invoice" in the search bar to navigate directly to the invoice section.

OR

Please refer to this link for the Sales Invoice page:

https://books.giddh.com/pages/vouchers/sales/create


👤 Step 2: Add or Select a Customer

  • In the Customer field, select an existing customer from the drop-down.

  • If the customer is new:

  1. Click on "Add Customer"

  2. Enter required details such as: Customer Name, GST(if applicable), Billing Address, PIN code, Select party type

  3. Contact Details:- Contact number and Mail id.

These details will be saved in your master records for future use.

add_cutomer (1).webp

🧾 Step 3: Fill Invoice Details

Now fill out the invoice basics:

  1. Contact details – Enter the customer's contact number and email address

  2. Invoice Date – Select the current date or any relevant billing date based on when the transaction occurred.

  3. Due Date (Optional)– Specify the payment due date if it’s a credit-based transaction. This helps in tracking receivables and sending payment reminders.

  4. Terms –Indicate whether the transaction is applicable under Reverse Charge Mechanism (RCM).

  • For example: "This transaction is subject to reverse charge under GST, if applicable.

contact_details (1).webp

📦 Step 4: Add Product/Service Information

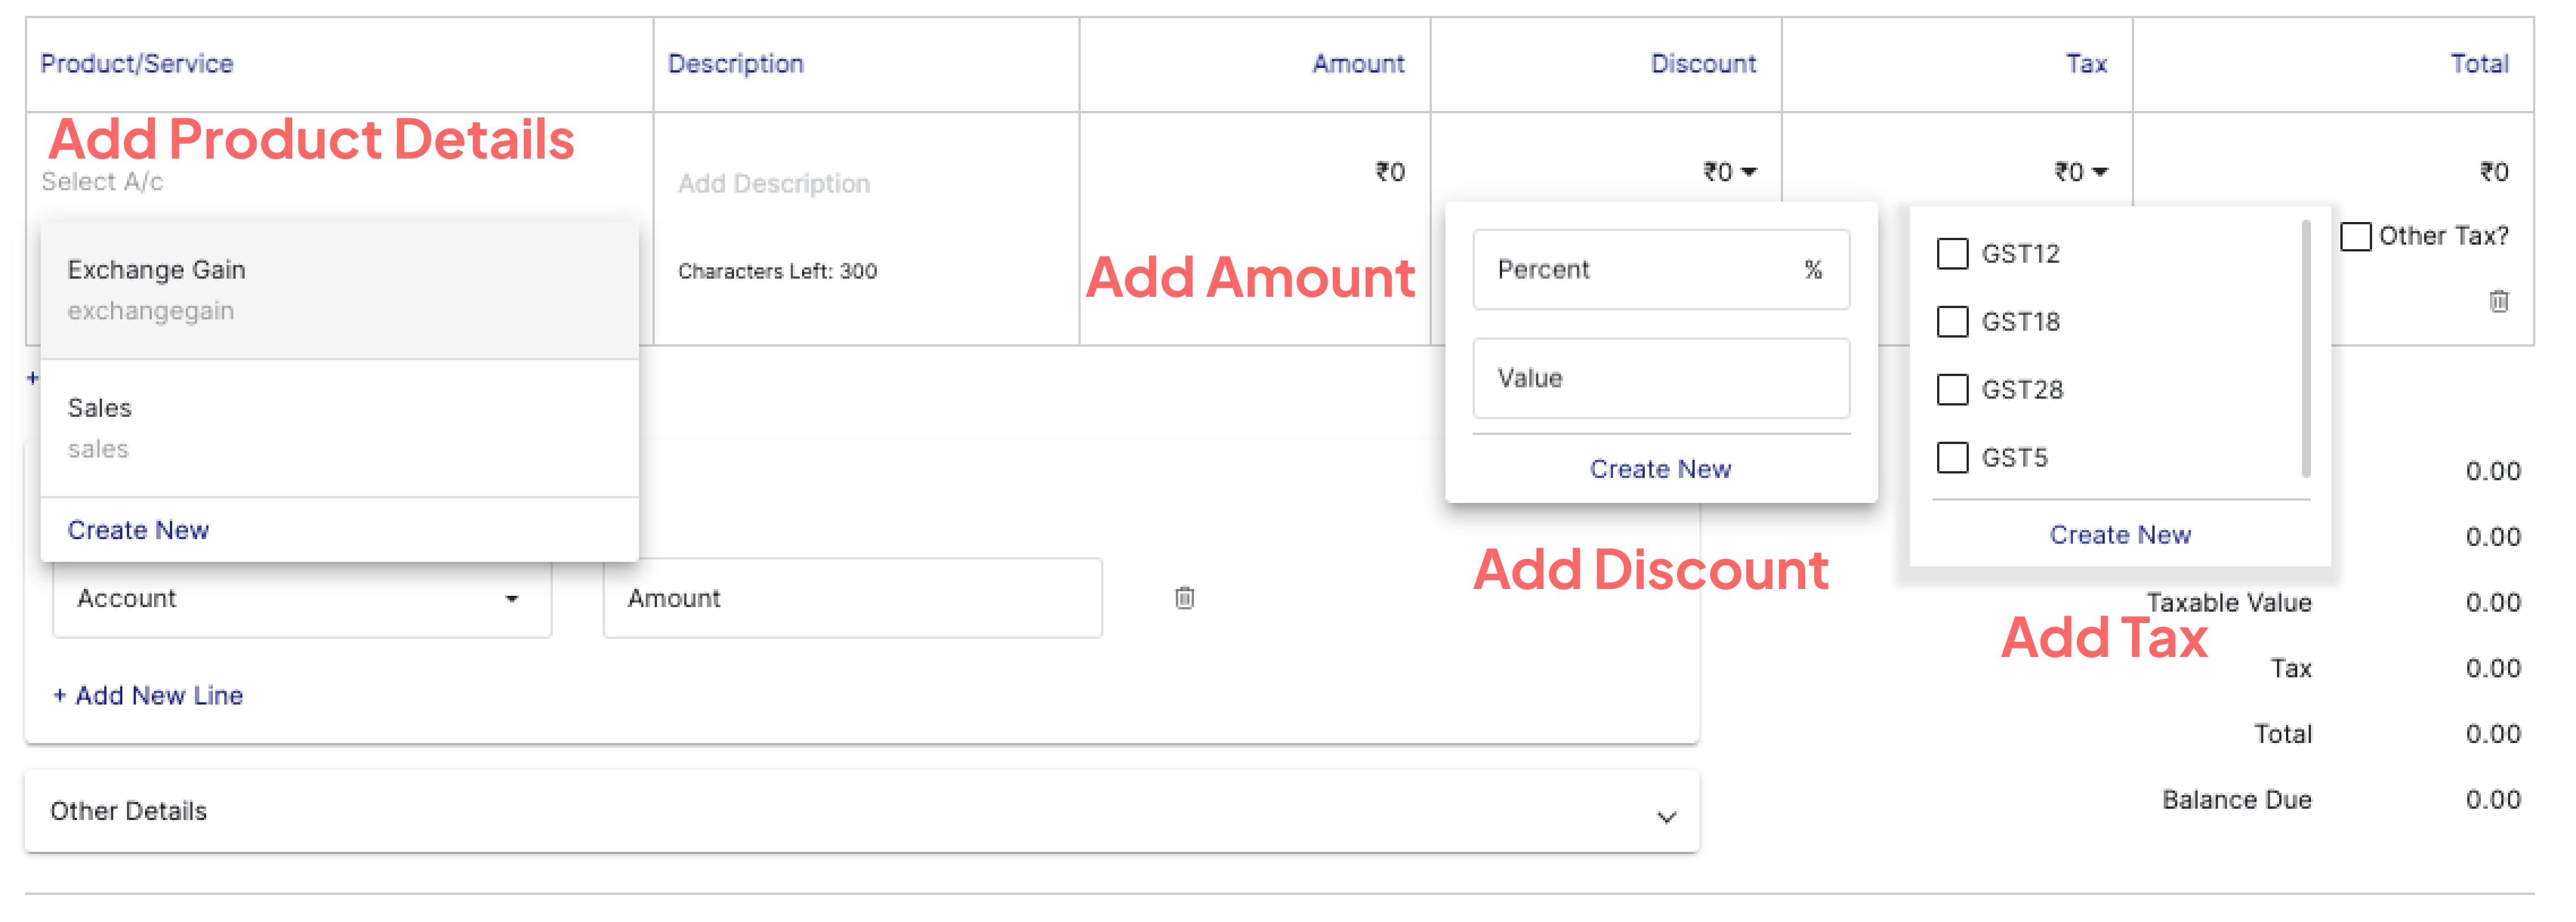
Click on “Product/Service” to add products or services.

For Each Item, Fill in the Following Details:

  1. Item Name: Enter the name of the product or service you are billing for.

  2. Rate/Price: Enter the rate or unit price for the item or service.

  3. Tax (GST): Choose the applicable tax rate based on your item and place of supply:

  4. Discount (Fixed or %): You can apply either:

  • A fixed discount amount (e.g., ₹500 off)

  • Or a percentage-based discount (e.g., 10%)

If you have many items to add, click on “Add Bulk Entries” to upload or input multiple items quickly.

product_details.webp

💰 Step 5: Select Payment Mode

Once you’ve added all invoice details and items:

  1. Scroll to the bottom of the invoice page and click on "Select Account."

  2. A list of your Cash and Bank accounts (from your Chart of Accounts) will appear.

  3. Choose the appropriate account where the payment is being received, such as:

  • Cash – if the payment was made in hand.

  • Bank Account – if received via NEFT, UPI, cheque, or any bank transfer.

generatew_o_no.webp

Step 6: Choose Action Type (optional)

Once all details are entered, Click on the “Other Details” button (Optional):

Fill in the optional fields:

  • Ship Date – Date of shipment

  • Ship Via – Mode of transport (e.g., courier, transport agency)

  • Tracking No. – Shipment tracking number

  • Add Note – Any additional remarks for internal use or customer reference

  • Attach Voucher – Upload any supporting document or payment proof if required

Step 7:Generate and Finalize the Invoice
Generates the invoice and sends it directly via email or SMS (ensure SendGrid/Msg91 is configured).

Once all the information is reviewed: Click on “Generate Invoice”.


How to generate sales invoice in Giddh
GenerateSalesInvoiceCreateSalesInvoiceCreatSalesInvoiceinGiddhSalesInvoiceHowToGenerateSalesInvoiceinGiddh
Jul 5, 2025

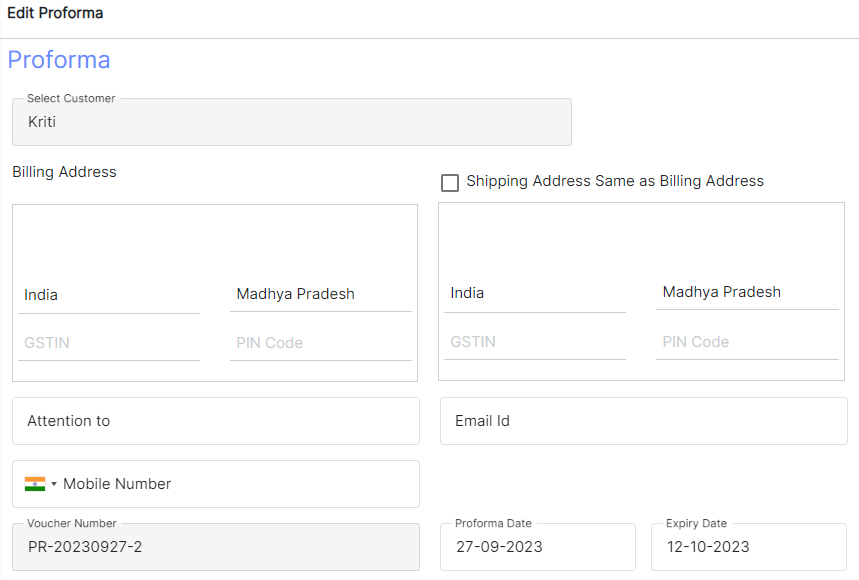
A Proforma Invoice is a non-binding document issued before a commercial invoice. It serves as a quotation or intent to sell and is commonly used for internal records, pre-approval, or export transactions. Below is a detailed step-by-step guide to help you create a proforma invoice in Giddh.


Step 1: Use Search to Access the Proforma Module

  • Press Ctrl + G (Windows) or Cmd + G (Mac) to open the universal search bar.

  • Alternatively, click on the Search icon (🔍) located at the top-right of your screen.

  • Type “Proforma” in the search bar and select the Proforma Invoice module from the dropdown results.


    OR


    Please refer to this link for the Proforma Invoice page:

    https://books.giddh.com/pages/vouchers/proformas/create

Step 2: Add or Select a Customer

  • In the Customer field, select an existing customer from the drop-down.

  • If the customer is new:

  1. Click on "Add Customer"

  2. Enter required details such as: Customer Name, GST(if applicable), Billing Address, PIN code, Select party type

  3. Contact Details:- Contact number and Mail id.

These details will be saved in your master records for future use.

add_cutomer (1).webp

Step 3: Fill Invoice Details

Now fill out the invoice basics:

  1. Contact details – Enter the customer's contact number and email address

  2. Invoice Date – Select the current date or any relevant billing date based on when the transaction occurred.

  3. Due Date (Optional)– Specify the payment due date if it’s a credit-based transaction. This helps in tracking receivables and sending payment reminders.

  4. Terms –Indicate whether the transaction is applicable under Reverse Charge Mechanism (RCM).

  • For example: "This transaction is subject to reverse charge under GST, if applicable.

contact_details.webp

Step 4: Add Product/Service Information

Click on “Product/Service” to add products or services.

For Each Item, Fill in the Following Details:

  1. Item Name: Enter the name of the product or service you are billing for.

  2. Rate/Price: Enter the rate or unit price for the item or service.

  3. Tax (GST): Choose the applicable tax rate based on your item and place of supply:

  4. Discount (Fixed or %): You can apply either:

  • A fixed discount amount (e.g., ₹500 off)

  • Or a percentage-based discount (e.g., 10%)

If you have many items to add, click on “Add Bulk Entries” to upload or input multiple items quickly.

product_details.webp

Step 5: Choose Action Type (optional)

Once all details are entered, Click on the “Other Details” button (Optional):

Fill in the optional fields:

  1. Ship Date – Date of shipment

  2. Ship Via – Mode of transport (e.g., courier, transport agency)

  3. Tracking No. – Shipment tracking number

  4. Add Note – Any additional remarks for internal use or customer reference

  5. Attach Voucher – Upload any supporting document or payment proof if required

Step 6: Choose Action to Finalize the Proforma

  • At the bottom of the invoice page, click on the “More” button.

  • You’ll be presented with the following options:

  1. Create & Send – Instantly generate the proforma invoice and send it via email or SMS to the customer (ensure email/SMS integration is active).

  2. Create & Print – Generate the proforma in a printable format, ready for documentation or manual delivery.

  3. Create – Save the proforma invoice in Giddh without sending or printing. You can send or print it later.

Proforma Invoice Successfully Created

  • The generated proforma will be saved in the system and can be accessed anytime under the Customer » Invoice » Proforma Invoices section.

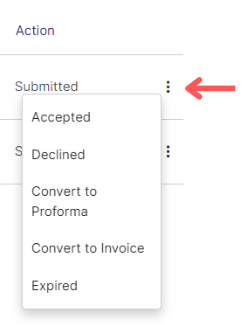
  • You can later convert this proforma into a Sales Invoice if the order is confirmed.

How to generate Proforma
GenerateProformaCreateProformaNewProforma
Jul 5, 2025

A Credit Note is an official document issued to a customer to adjust or cancel a part of a previously issued invoice. It is commonly used in cases such as product returns, overbilling, or providing post-sale discounts. Giddh makes it easy to generate and manage credit notes efficiently.

Step 1: Search for “New Credit Note”

Giddh offers a powerful search shortcut to help you quickly locate any feature or module:

Press Ctrl + G on Windows or Cmd + G on Mac,

In the search bar, type “New Credit Note”.

Select the New Credit Note option that appears in the search results.

OR

Please refer to this link for the Credit Note page:

https://books.giddh.com/pages/vouchers/credit-note/create

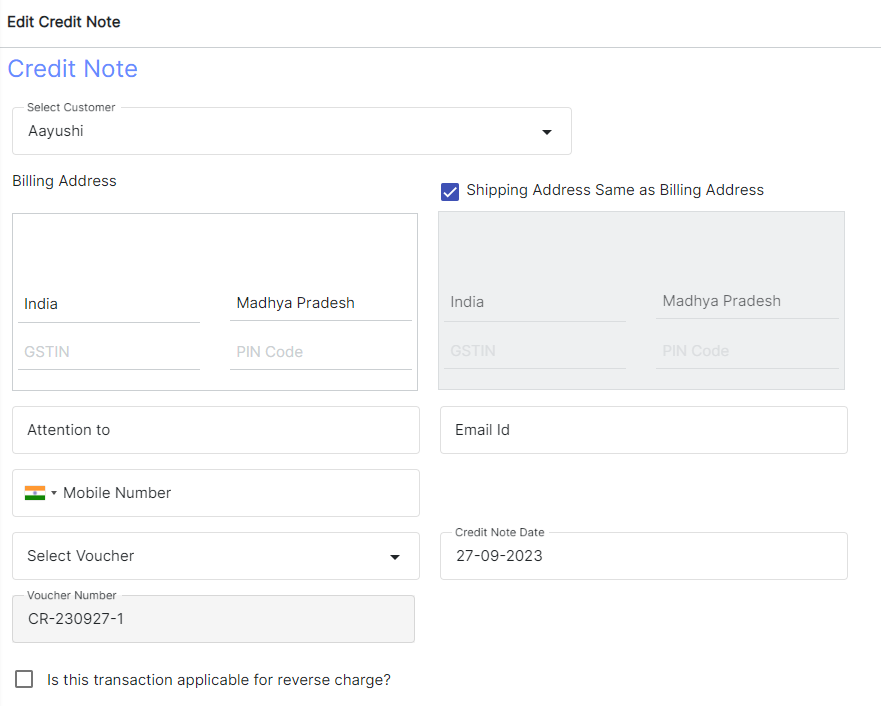
Step 2: Select an Existing Customer or Add a New One

  • In the Customer field, choose the customer for whom you want to issue the credit note.

  • If the customer does not exist in your records, click “Add Customer”.

  • Enter all the required customer details, including:

  1. Customer Name – Full legal name of the customer or business

  2. Mobile Number and Email – For communication and delivery of the credit note

  3. Billing Address – For documentation and tax reporting

  4. GST – Required for GST-compliant credit notes

Enter Email id and Mobile Number.png

Step 3: Fill in Product or Service Information

Add the items or services that are being adjusted or returned through the credit note.

For each line item, fill out:

  1. Item Name – Select from your inventory/service list or type manually.

  2. Quantity – Specify how many units are being returned or adjusted.

  3. Rate/Price – The rate per unit (before tax).

  4. Applicable Tax (%) – Select GST based on your tax setup and the nature of the transaction.

  5. Discount – If applicable, enter any discount offered during this adjustment (fixed or percentage)

Select ProductService.png

Step 4: Generate the Credit Note

  • After carefully reviewing all customer and item details, scroll down to the bottom.

  • Click the “Generate Credit Note” button to save and issue the document.

Once generated:

  • The credit note will be stored in the Credit Notes section of your account.

  • You can download it as a PDF, email it to the customer, or link it with the original sales invoice.

  • The amount will reflect in the customer’s ledger as a reduction in receivables or as a balance available for future use.


How to Create Credit Note
Jul 10, 2025

A Debit Note is issued to a vendor when you return goods, report overcharged invoices, or need to adjust previously issued bills. In Giddh, creating a Debit Note is simple and structured.

Step 1: Search for “New Debit Note”

Giddh offers a powerful search shortcut to help you quickly locate any feature or module:

Press Ctrl + G on Windows or Cmd + G on Mac,

In the search bar, type “New Debit Note”.

Select the New Credit Note option that appears in the search results.

OR

Please refer to this link for the Credit Note page:

https://books.giddh.com/pages/vouchers/preview/debit-note/list

Step 2: Select an Existing Vendor or Add a New One

  • In the Customer field, choose the vendor for whom you want to issue the Debit note.

  • If the customer does not exist in your records, click “Add Vendor”.

  • Enter all the required customer details, including:

  1. Vendor Name – Full legal name of the Vendor or business

  2. Mobile Number and Email – For communication and delivery of the credit note

  3. Billing Address – For documentation and tax reporting

  4. GST – Required for GST-compliant credit notes

Step 3: Fill in Product or Service Information

Add the items or services that are being adjusted or returned through the Debit note.

For each line item, fill out:

  1. Item Name – Select from your inventory/service list or type manually.

  2. Quantity – Specify how many units are being returned or adjusted.

  3. Rate/Price – The rate per unit (before tax).

  4. Applicable Tax (%) – Select GST based on your tax setup and the nature of the transaction.

  5. Discount – If applicable, enter any discount offered during this adjustment (fixed or percentage)

Step 4: Generate the Credit Note

  • After carefully reviewing all customer and item details, scroll down to the bottom.

  • Click the “Generate Debit Note” button to save and issue the document.

Once generated:

  • The credit note will be stored in the Debit Notes section of your account.

  • You can download it as a PDF, email it to the customer, or link it with the original sales invoice.

Select the existing Vendor or click on "Add Vendor" to add a new vendor.

Fill the product or service information

Now click on 'generate Debit Note' to successfully generate a debit note


Screenshot 2025-06-07 170645.png

How to Create Debit Note
GenerateDebitNoteDebitNoteCreateDebitNote
Jul 8, 2025

A QR code on an invoice allows customers to quickly scan and make payments or access specific information related to the invoice. In Giddh, adding a QR code is a simple process, especially if you're using digital payment integration (like UPI, Razorpay, etc.).

Step-by-Step Process to Add QR Code

Step 1: Go to the Invoice Template Section


After logging into your Giddh account, go to the left-hand menu and click on Customer, then select Templates. This section allows you to manage and customize templates.


OR

You can also directly access the invoice template editor using this link:

👉

https://books.giddh.com/pages/vouchers/preview/sales/templates?tabIndex=3

payment_template_reduced.webp

Step 2: Select and Edit Your Invoice Template

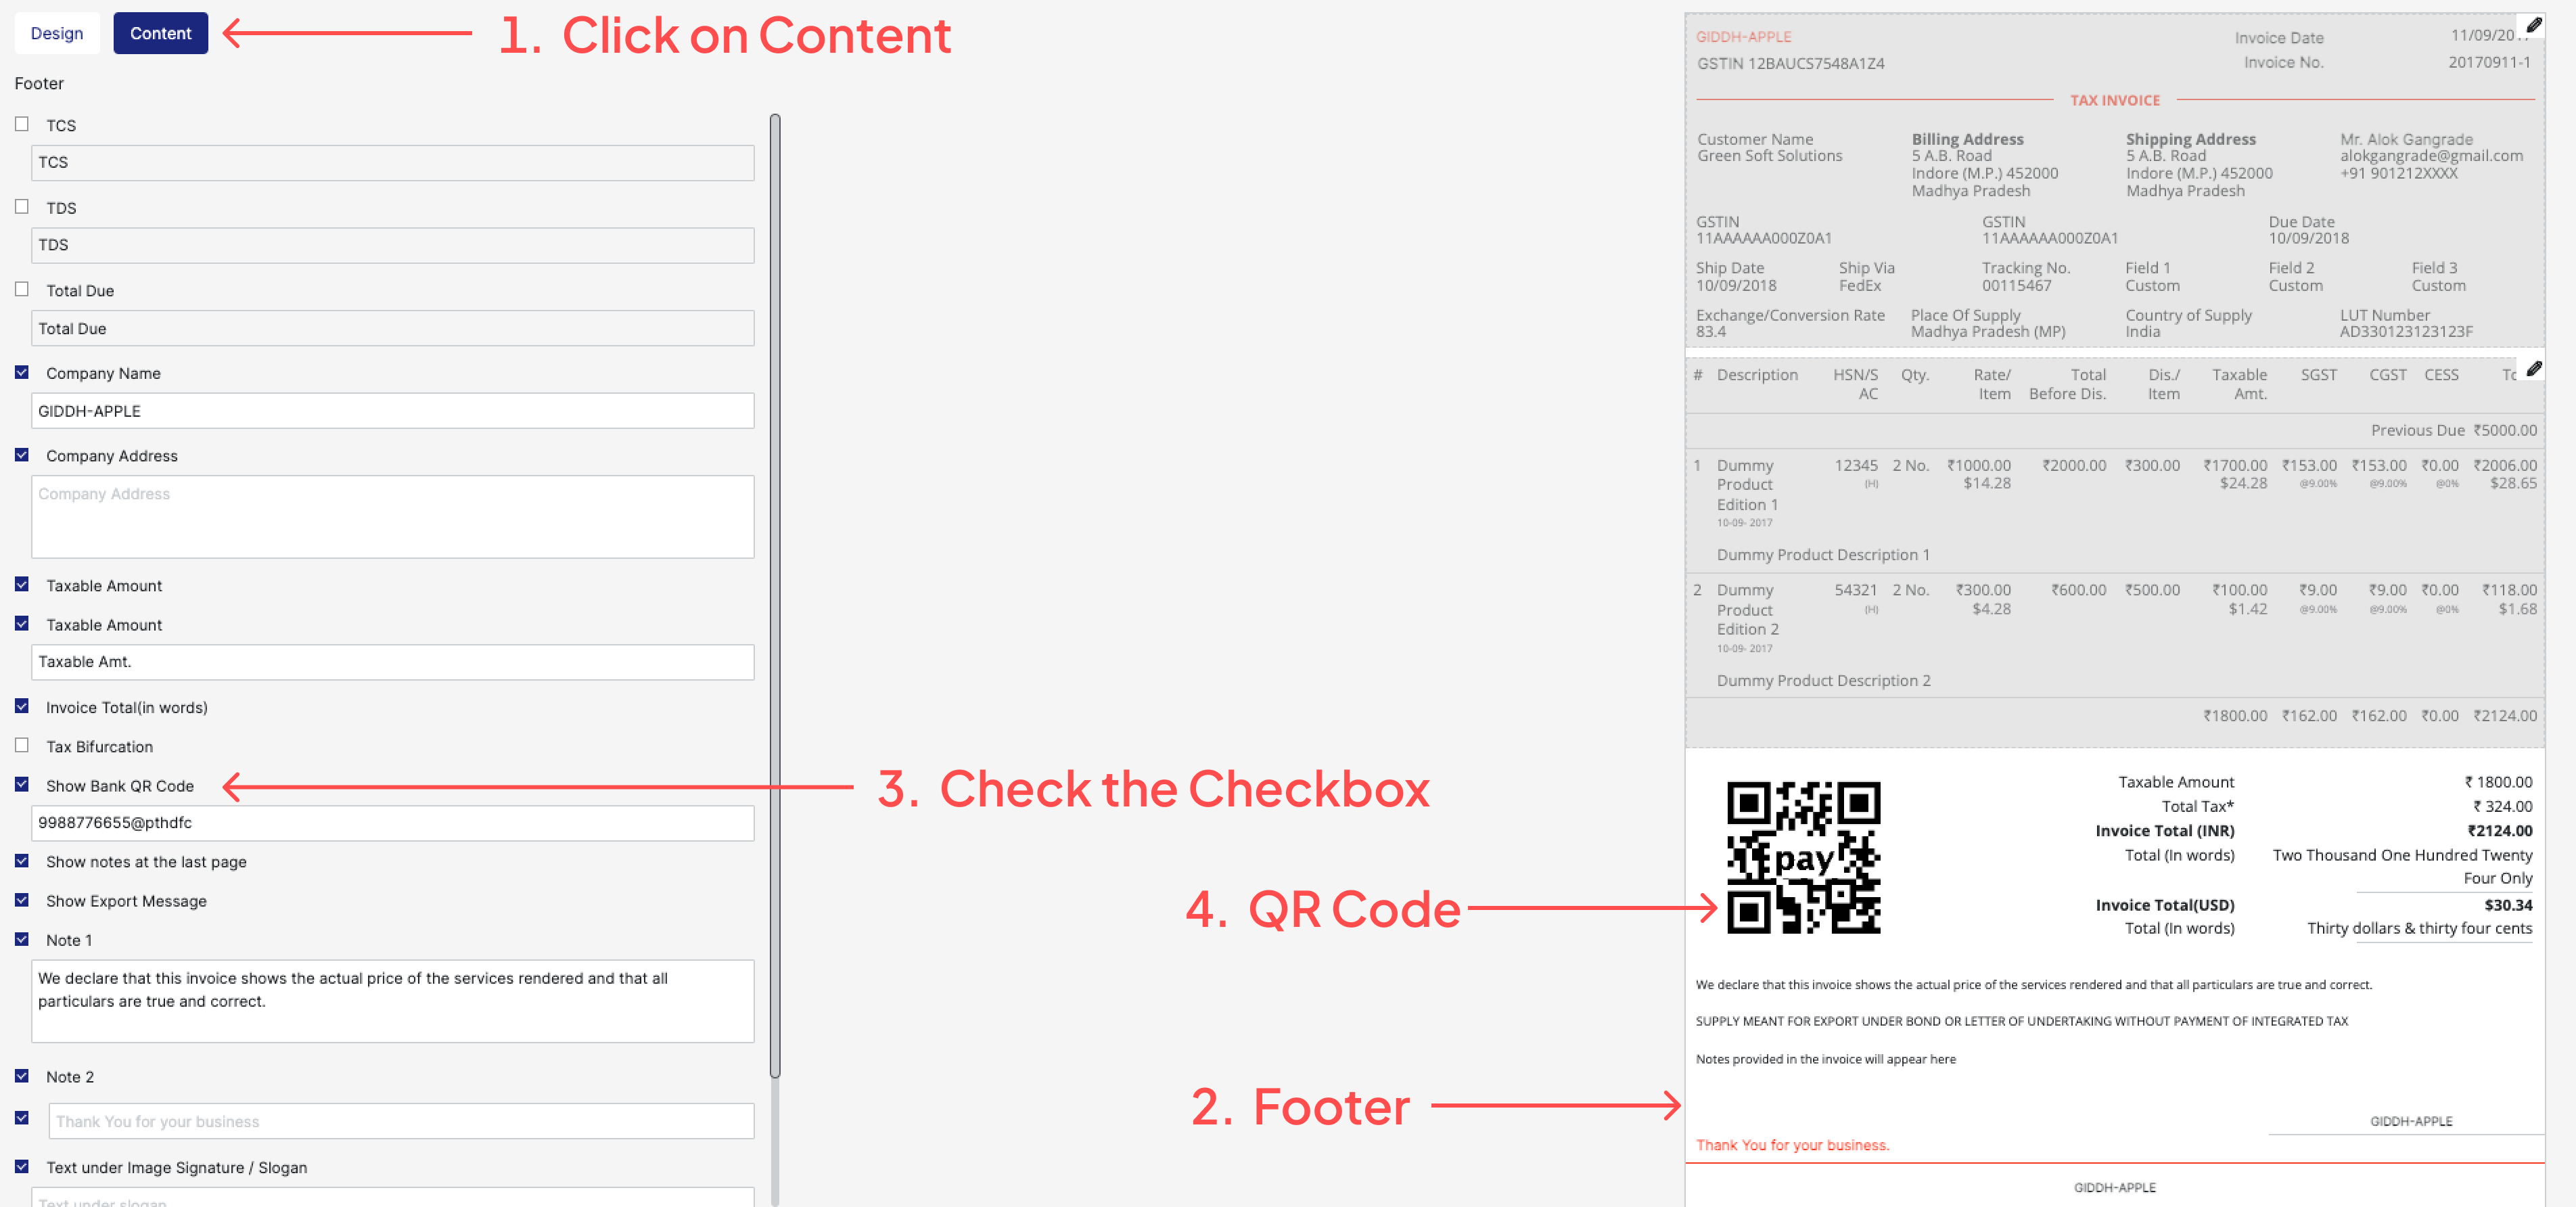
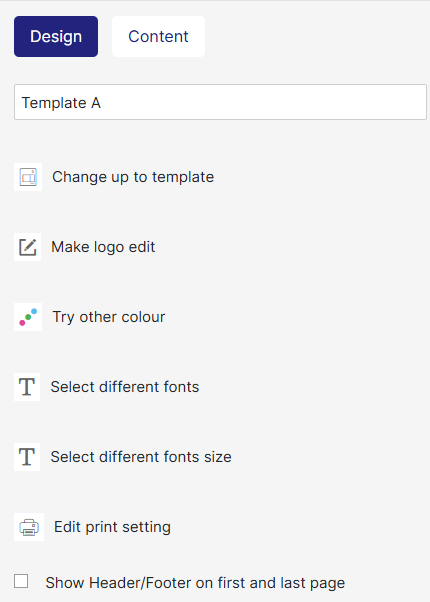
  1. When you access the Template section, you'll see a list of available invoice templates. Identify the template you are using for Sales Invoices. On the template, you will find the Edit icon (🖉) - click on it to open the editor.

  2. Once the editor opens, navigate to the “Content” tab. This section allows you to manage what appears in different parts of the invoice, such as the Header, Body, and Footer, including the option to add a QR code.

Step 3: Navigate to the Content Section

You will have the option to insert the QR code in the Footer section.

  • Footer: Positioning the QR code at the bottom keeps the layout clean and aligns it with the total amount, payment instructions, and terms & conditions. This placement is commonly used for maintaining a formal invoice structure.

Step 4: Enable QR Code and Enter UPI Details

  1. Scroll to the option "Show Bank QR Code" and enable it by ticking the checkbox.

  2. Enter your UPI ID (e.g., yourname@upi or 9876543210@paytm).

  3. Giddh will auto-generate a QR code in real time.

  4. This will be shown on all invoices using this template.

Step 5: Save and Apply the Template

  • Once you’ve finished adding the QR code and reviewing all the changes made to the invoice layout, scroll down and click on the “Save” button at the bottom of the page to apply your changes.

  • After saving, make sure to click on “Set as Default” if you want this updated template to be used automatically for all future sales invoices.

  • From now on, every new sales invoice generated using this template will automatically include the QR code, allowing your customers to make quick and convenient payments via UPI.

⚠️ Important Information

  • No Payment Notification in Giddh: Giddh doesn’t get live updates from your bank or UPI. The QR code is only for scanning. Please check your bank or UPI app to confirm the payment manually.

  • No auto-entry in Giddh: The transaction will not reflect in your Giddh account automatically—you need to record the payment manually if needed.

How to Add Bank QR in Invoice Template
Jul 10, 2025

A receipt is used to record the amount received from a customer, such as payments against sales invoices, advances, or direct credits. Giddh allows you to easily create and manage receipts to maintain accurate cash flow and ledger balances.

Select Customer (1).png

Step 1: Access the Receipt Section

You can access the receipt module in two ways:

Press Cmd + G (Mac) or Ctrl + G (Windows) and type “Receipt” to quickly locate the receipt section using the global search.

OR

You can directly access the receipt page using the link below:

https://books.giddh.com/pages/vouchers/receipt/create

Step 2: Add or Select a Customer

  1. In the Customer field, select an existing customer from the drop-down.

  2. If the customer is new:

  • Click on "Add Customer"

  • Enter required details such as: Customer Name, GST(if applicable), Billing Address, PIN code, Select party type

  • Contact Details:- Contact number and Mail id.

  • These details will be saved in your master records for future use.

Step 3: Enter Receipt Information

Once the customer is selected, fill out all relevant receipt details. These include:

  1. Receipt Date: Choose the date on which the payment was received.

  2. Cheque Number: If the payment mode is cheque, enter the cheque/reference number for tracking.

  3. Mobile Number and Email ID: These fields are auto-filled if customer details were entered previously but can be edited if needed.

  4. Full Address: Ensure address details are complete for documentation purposes.

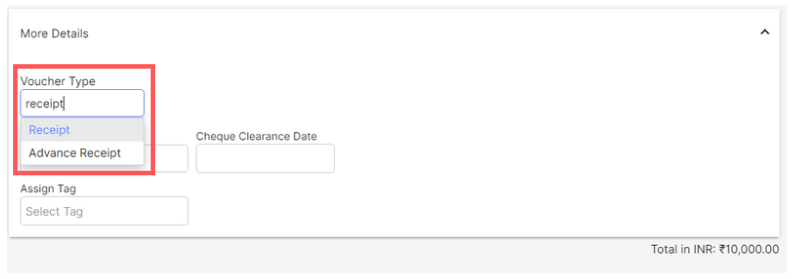
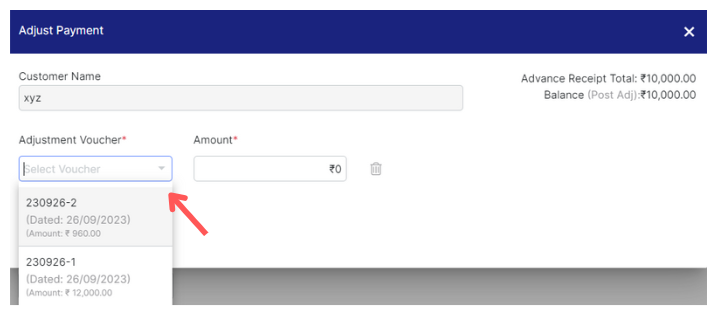
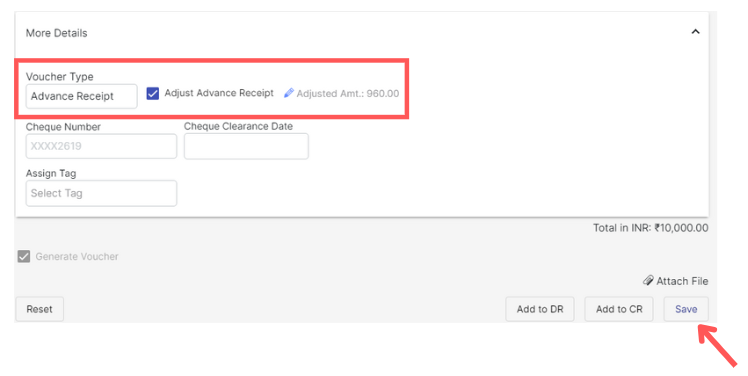
  5. Advance Receipt Option: If the receipt is being recorded as an advance payment (before a sales invoice is generated), enable the Advance Receipt option. This is especially important for GST compliance.

Step 4: Add Payment and Transaction Details

Provide the financial details of the receipt:

  1. Receipt Mode: Select the mode of payment received. Options include: Cash or Bank Transfer

  2. Amount: Enter the total amount received from the customer.

  3. Additional Notes (Optional): You may add any relevant comments or internal notes regarding the payment-for example, reference to a related invoice, payment terms, or special conditions.

Step 5: Generate and Save the Receipt

After entering all the necessary information:

  1. Review the details thoroughly to avoid errors.

  2. Click the “Create Receipt”, “Create & Send” or “Create & Print” button at the bottom of the page.

How to Create Receipt
Jul 10, 2025

Step 1: Search for the Invoice

You can search for the invoice using either of the following methods:

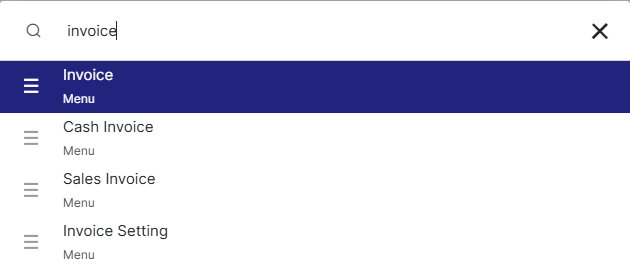
Press Ctrl+G (on Windows) or Cmd+G (on Mac) to open the global search bar

Type “Invoice” and select the relevant option.

OR

Please refer below link to access invoice page

https://books.giddh.com/pages/vouchers/preview/sales/list

Step 2: View a Specific Invoice

Once you're in the invoice list view:

  • Locate the invoice you want to print or download.

  • Click on the Invoice Number to open it.

  • The invoice preview will be displayed, showing all relevant details such as items, taxes, totals, and customer information.

Select Date Range.png

Step 3: Print the Invoice

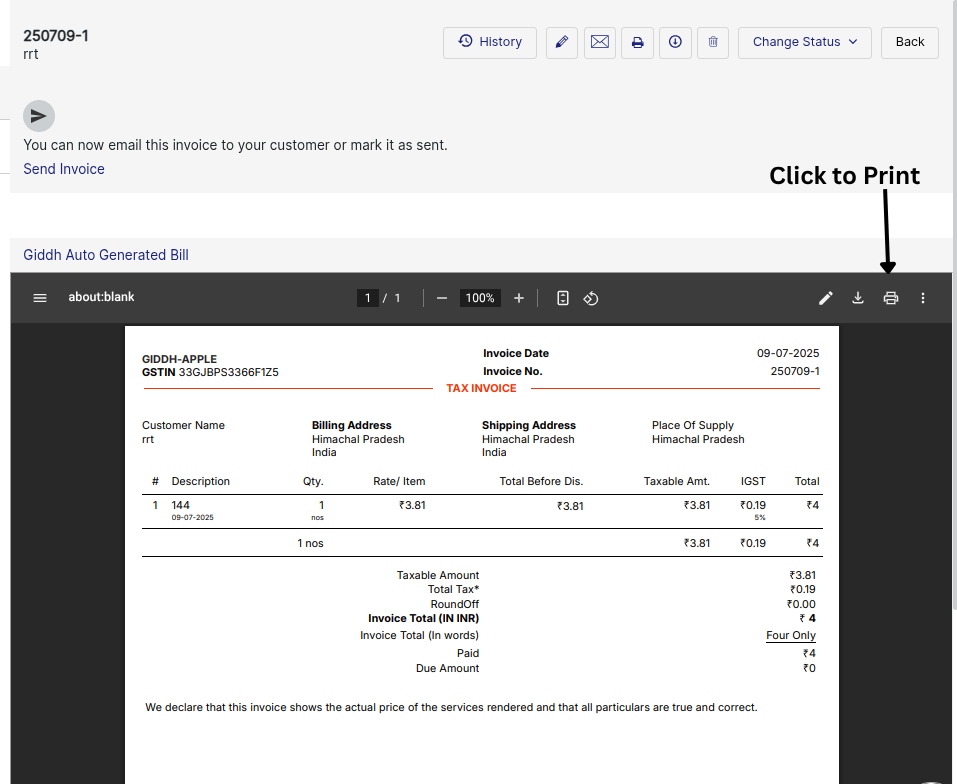
To take a physical print of the invoice:

  • Click on the Print icon visible on the top right of the invoice preview page.

  • Choose your printer and settings, then click Print.

Click to Print.png

Step 4: Download the Invoice

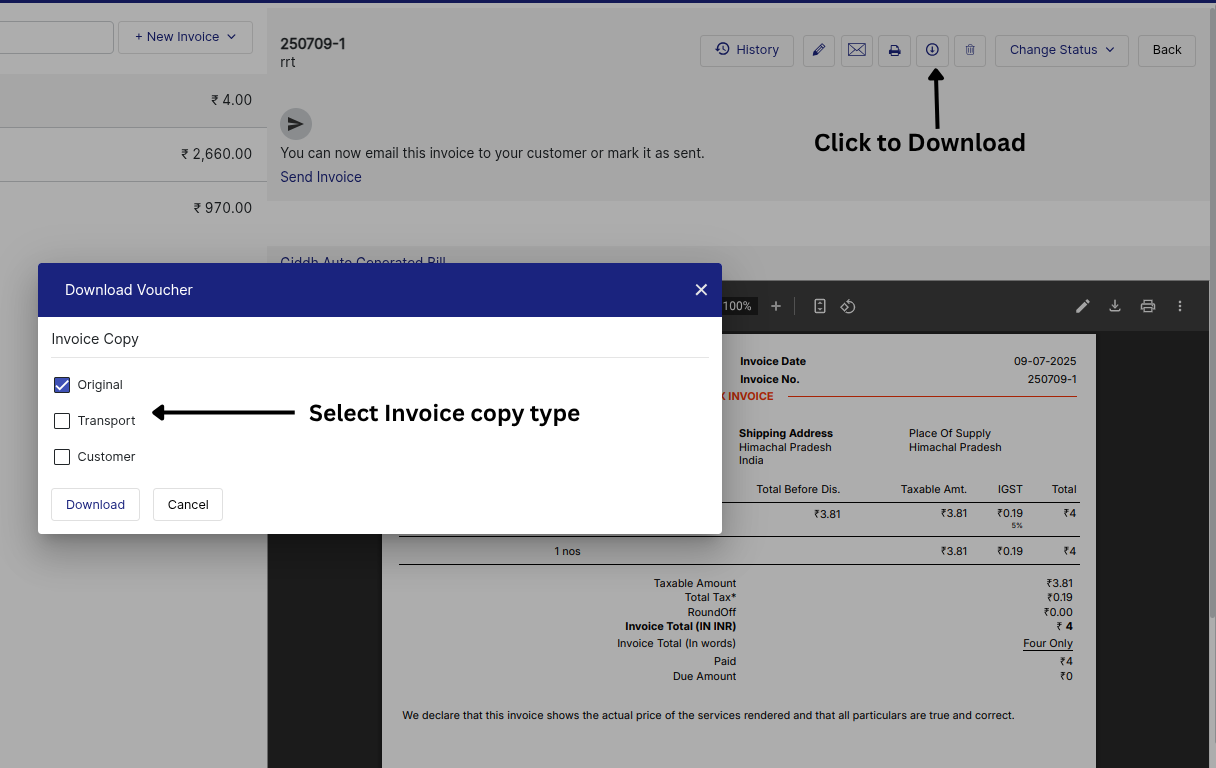
Giddh offers flexible download options to suit different invoice-sharing requirements. You can choose to download the original invoice directly or select from multiple copy types depending on the purpose.

Option 1: Direct Download of Original Copy

  • When viewing an invoice, you can simply click on the Download icon.

  • This will immediately download the Original copy of the invoice in PDF format.

Click to Print (3).png

Option 2: Select Copy Type Before Downloading

When you click the Download button with multiple options, you will be prompted to choose from the following:

Original: This is the main invoice copy, typically used for company records or official filing.

Customer: This is the triplicate copy meant for sharing with your customer.

Transport: This is the duplicate copy of the invoice, mainly used for logistics or transport purposes.

Click to Download.png

How to Download and Print an Invoice In Giddh
Jul 11, 2025

Giddh allows you to export multiple invoices at once in PDF format, making it easy to download, email, or archive your billing records. This feature is especially useful for reporting, sharing with clients, or maintaining backups.

Steps to Export Bulk Invoices as PDF

1.Log in to Your Giddh Account

Use one of the following methods to access the invoices:

Press Ctrl + G (on Windows) or Cmd + G (on Mac) to open the global search bar. Type “Invoice” and select the relevant option from the list.

OR

You can directly access the invoice page using the following URL:

https://books.giddh.com/pages/vouchers/preview/sales/list

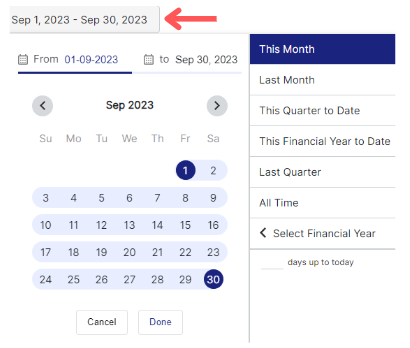
2.Select Date Range

  • Click on the "Date Range" button on the Invoice page. Choose the specific date range for which you want to view or export invoices. Giddh will display all invoices generated during the selected period.

  • You can either select all invoices or choose specific invoices for export, based on your requirement.

3.Click on the Export Button

Once your desired invoices are visible, click on the Export button. This is usually located near the top of the invoice list or under a menu drop-down.

4.Choose the Copy Type

After clicking Export, you’ll be prompted to select the type of invoice copy you want to download or send. Giddh typically offers options such as:

Original

Duplicate

Triplicate

Choose the one based on your requirement.

5. Download Report

  • Click on the “Download” button.

  • You can view the downloaded report in Giddh under the 'Download' section.

OR

  • You can also access the download history directly from the Giddh portal by visiting the following URL:

    https://books.giddh.com/pages/downloads

How to export PDF of bulk invoices
ExportBulkInvoiceEmailBulkInvoiceExportPDF
Jul 9, 2025

Estimates in Giddh are useful when you want to provide your customer with a quotation or cost proposal before creating an invoice. These can later be converted into actual invoices once confirmed.

Step 1: Access the Estimates Section

To open the estimate creation page:

Press Ctrl + G (Windows) or Cmd + G (Mac) to open the global search bar

Type “Estimate” and select the appropriate option

OR

Please refer to the URL below to access the Estimate page.

https://books.giddh.com/pages/vouchers/estimates/create

Step 2: Select or Add a Customer

  • Choose an existing customer from the dropdown list

  • If the customer is new, click “Add Customer” to enter their basic information such as: Customer Name, Email ID, Mobile Number, Billing/Shipping Address

Select Customer or Add New Customer (1).png

Providing complete and accurate customer details helps link the estimate correctly to their account.

Step 3: Add Product/Service Details

  • Enter the items being estimated: product name, quantity, rate, and applicable taxes.

  • If you're adding multiple items, use the "Add Bulk Entries" option to save time.

  • Include any discounts (fixed or percentage) where applicable.

Select ProductService (1).png

Step 4: Finalize and Create

After filling in all details:

  1. Click on the “Create” button to save the estimate.

  2. Alternatively, you can use:

  • Create & Send – to generate the estimate and immediately send it to the customer via email.

  • Create & Print – to generate the estimate and directly print a physical copy for your records or client.

The estimate will now be available under your estimates list and can later be converted into a sales invoice if approved by the customer.

How to generate Estimates
CreateEstimateGenerateEstimate
Jul 10, 2025