FAQ
Developer hub

Developer hub


What is the Developer Hub?

The viaSocket Developer Hub is a dedicated space for developers to build, test, and publish plugins that integrate external apps and APIs with viaSocket’s automation engine.

It’s where you can:

  • Create plugins that call external APIs

  • Set up OAuth or Basic Authentication

  • Define actions and triggers

  • Test plugin behavior

  • Publish plugins for private or public use

viaSocket Developer Hub is your integration workspace—connect your app and make it automation-ready.


Who is this for?

  • Developers building native integrations with their SaaS tools

  • Teams creating reusable actions (e.g. send email, update CRM, create deal)

  • API-first products that want to plug into automation with no backend logic

  • Makers building public plugins for the viaSocket marketplace


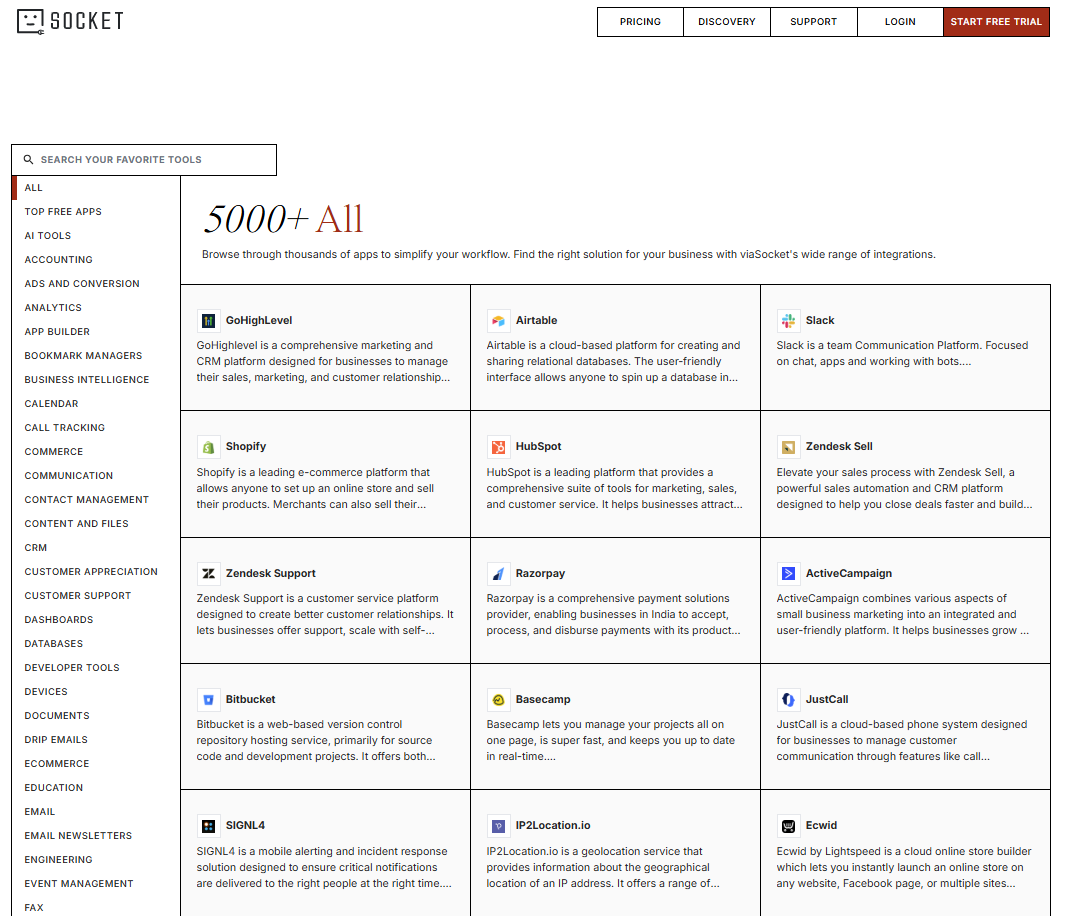
What Can You Build with Developer Hub?

  • Private plugins for your team’s workflows

  • Public plugins others can discover and use

  • Plugins that support OAuth, Basic Auth, or no-auth public endpoints

  • Multi-step actions and triggers

  • Apps with polling or webhook-based event detection


Getting Started in Developer Hub

1. Go to viasocket.com

→ Log in with your credentials.


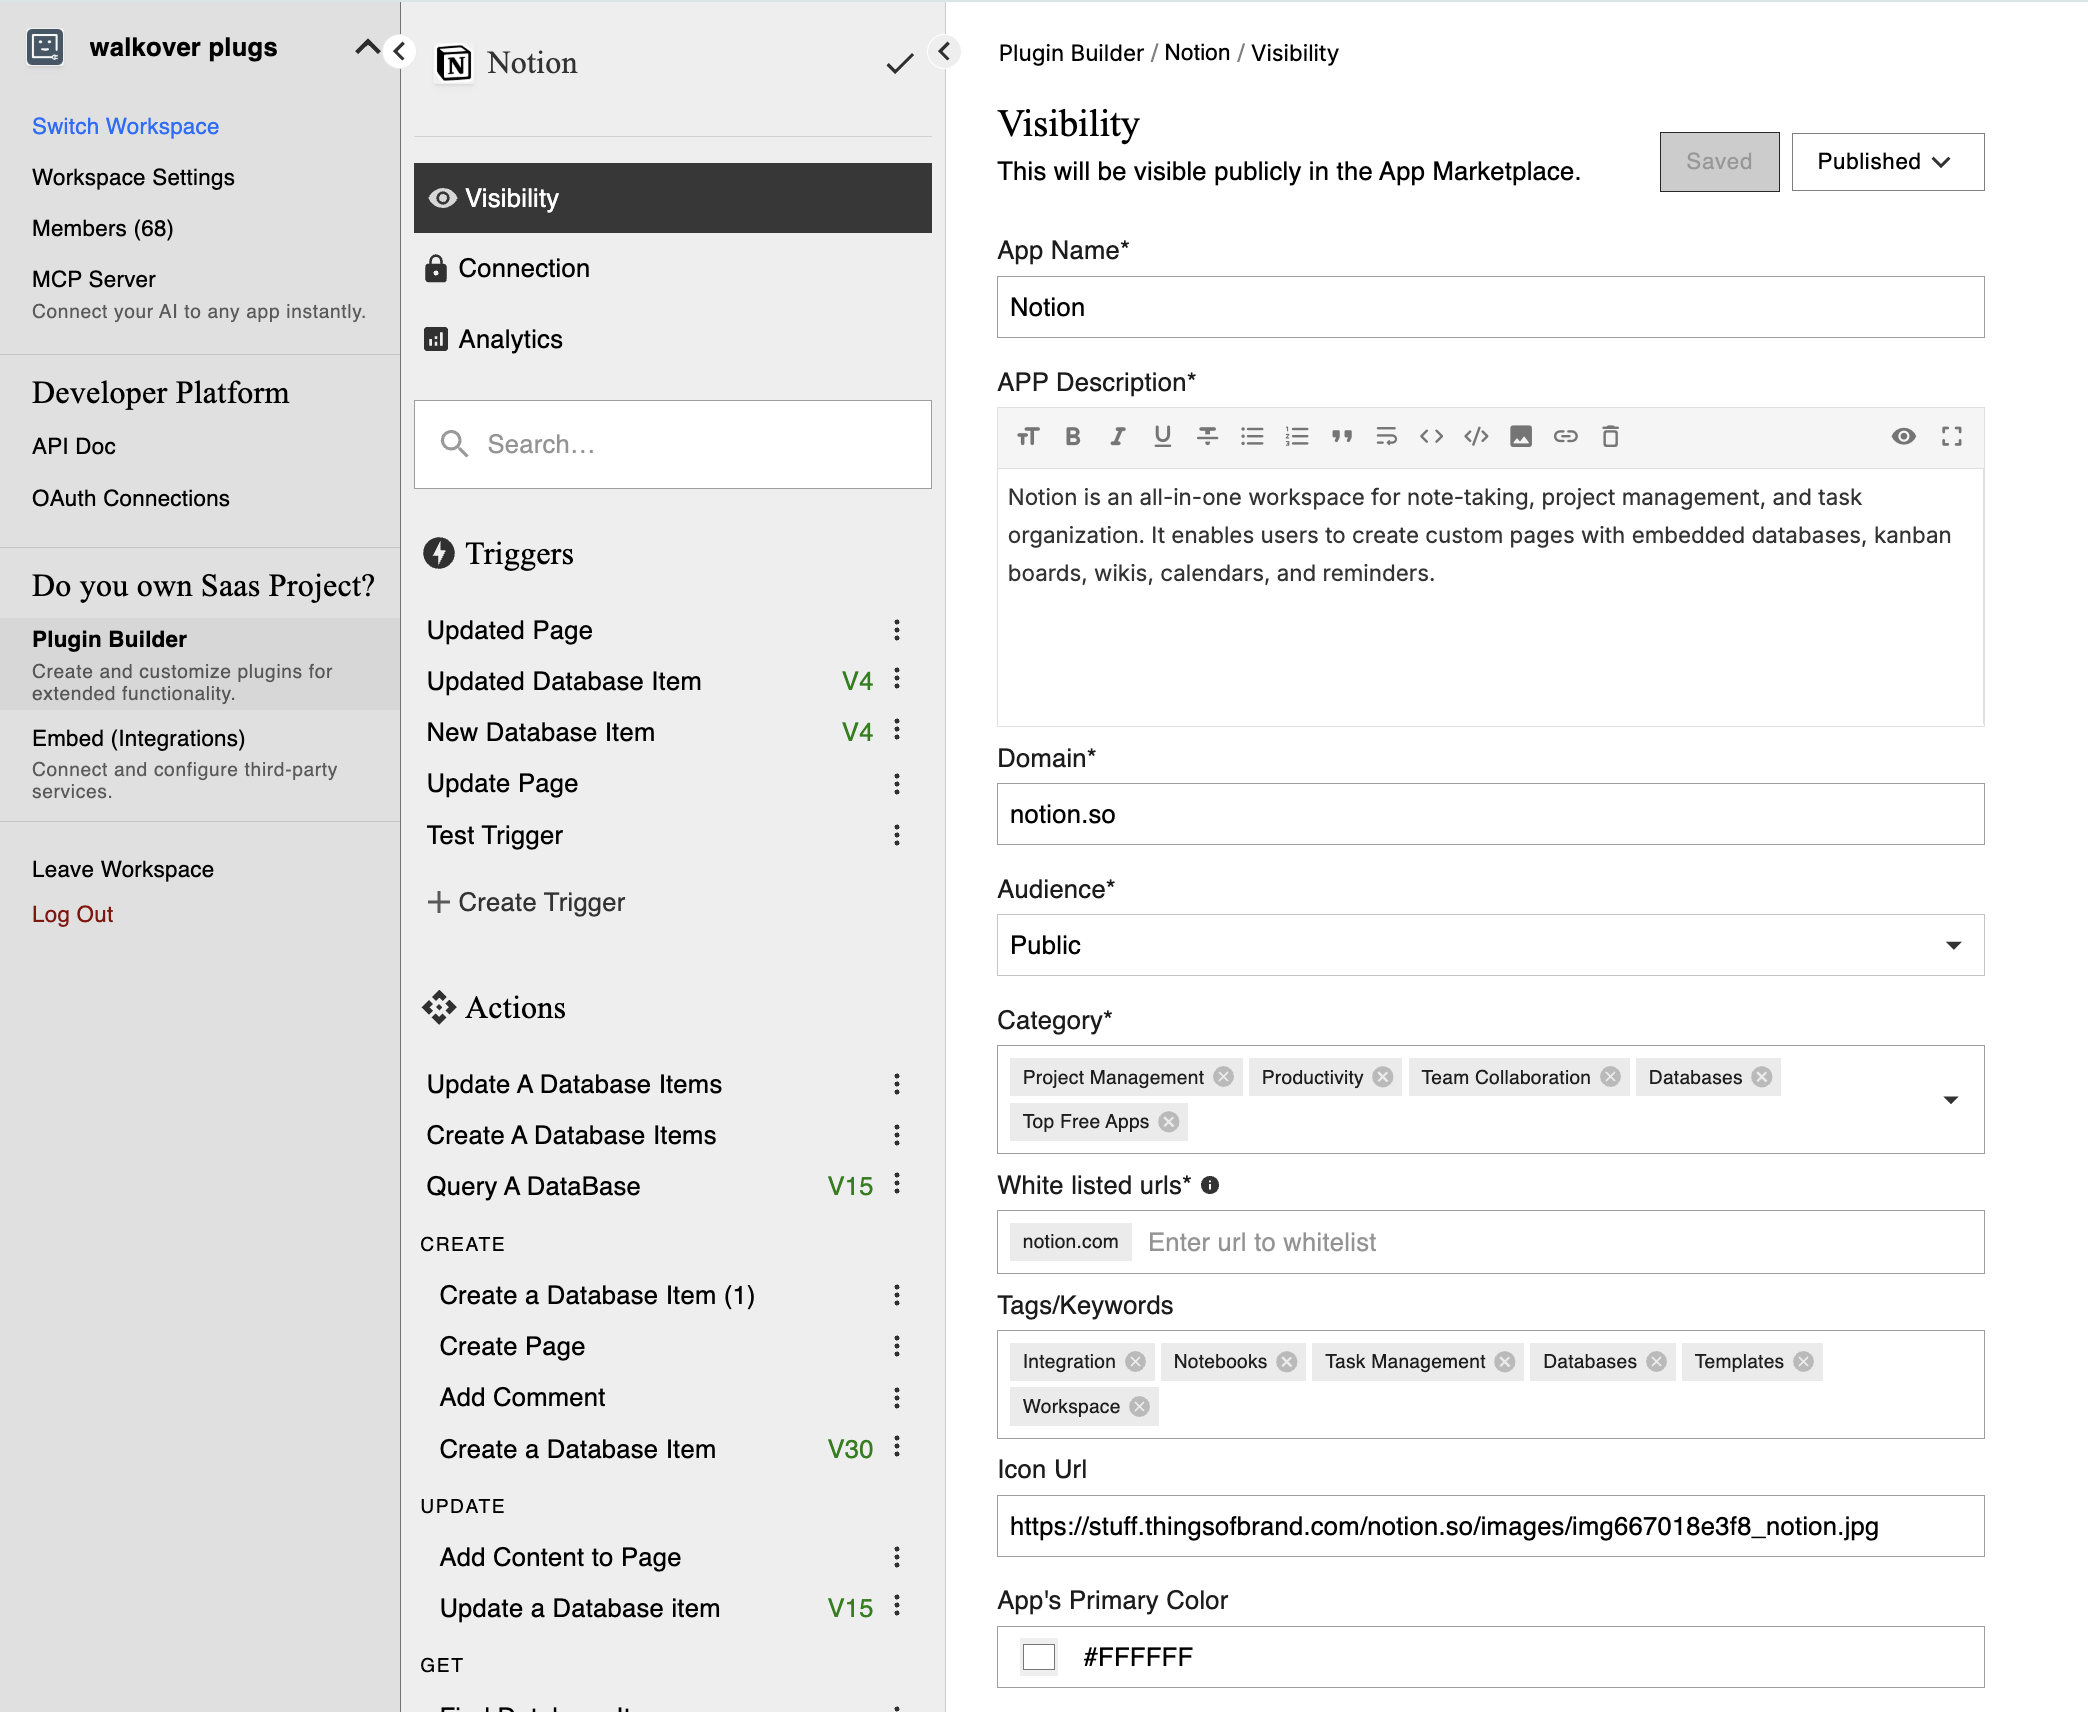
2. Open Plugin Builder

→ From the main dashboard sidebar, click “Plugin Builder” under Developer Hub.
This will open the interface where you can start creating and managing plugins.
📘 For Detailed Steps, Click here


3. Create a New Plugin

→ Click on “Create New Plugin”
Set your:

  • Plugin name

  • Domain (e.g., example.com)


4. Set Authentication

→ Choose the type of authentication your plugin needs:

  • 🔓 No Auth – for public APIs

  • 🔐 Basic Auth – use API keys or username/password

  • 🔁 OAuth 2.0 – recommended for secure, user-based access

📘 For Detailed Steps, Click here


5. Add Actions and Triggers

→ Define what your plugin does and when it runs:

  • Actions – API tasks like sending a message or creating a record (POST/GET/etc.)

  • Triggers – when the plugin fires: poll every X mins or listen via webhook

📘 For Detailed Steps, Click here


6. Test Your Plugin

→ Use the “Test” button to simulate plugin behavior with sample inputs.
→ Validate inputs and response mapping. The header will already be dynamically placed with the API call.


7. Submit or Use Your Plugin

  • Private – instantly usable in your workflows

  • Public – submit to viaSocket Marketplace for review and approval


Need Visual Help?

View the Developer Playbook
https://viasocket.my.canva.site/viasocket-dh-playbook

It visually walks you through:

  1. Basic Plugin Details
    → Set the plugin name, logo, and audience visibility

  2. Configure Authentication
    → Choose how users will authenticate (No Auth, Basic Auth, OAuth 2.0)

  3. Add Actions/Triggers
    → Define what your plugin does and when it should run

  4. Publish Plugin
    → Once tested, publish as private or submit for public listing on viaSocket


Developer-Specific FAQs

Q: Do I need to host my plugin?
→ No. viaSocket hosts the logic. You just define endpoints and fields.

Q: What’s the difference between Action and Trigger?
→ Actions perform tasks. Triggers listen to events (poll/webhook).

Q: Can I test my plugin without publishing it?
→ Yes. Private plugins can be tested instantly via the Developer Hub.

Q: How is OAuth handled?
→ viaSocket manages token exchange and refresh logic. You configure the URLs.

Q: What does public plugin review include?
→ Security checks, functional testing, and description accuracy.

  1. Follow these structured steps to build, configure, and publish your plugin inside viaSocket.


    Visibility Configuration

    Define how your plugin appears in the viaSocket ecosystem.

    • App Name – The display name of your plugin

    • App Description – A short summary of what your plugin does

    • Domain – e.g. yourapp.com

    • Audience – Private, Team, or Public

    • Category – App category (e.g. CRM, Messaging)

    • Icon URL – Icon for branding

    • Tags/Keywords – Help users find your plugin

    • App’s Primary Color – Branding theme

    • Whitelist URL – Allowed redirect domains for auth

    For Detailed Steps,

    Click here


    Authentication

    Let users securely connect their accounts to your plugin. Choose an authentication method based on your API.


    (a) Basic Auth

    Use this when APIs require an API key or simple username/password.

    • Configure your Fields

    • Configure Test (ME) API

    • Add Connection Label

    • Set Request Parameters

    For Detailed Steps,

    Click here


    (b) OAuth 2.0

    Best for secure, standards-based access. Supports multiple grant types:

    • Authorization Code

    • Configure your Fields

    • Copy OAuth Redirect URL

    • Enter App Credentials

    • Setup Authorization, Access Token, Refresh & Revoke Token APIs

    • Configure Test (ME) API

    • Add Connection Label

    • Add Unique Authentication Identifier

    • Set Request Parameters

    For Detailed Steps,

    Click here


    • Implicit Auth

    Used in public apps where refresh tokens are not supported.

    • Same steps as above, excluding Refresh Token

    • Simplified for browser-based apps

    For Detailed Steps,

    Click here


    • Client Credentials

    Used for server-to-server access.

    • Configure Token APIs

    • No user login needed

    • Add credentials, label, and identifier

    For Detailed Steps,

    Click here


    • Password Credentials

    Used for direct user login via username/password.

    • Setup Access & Refresh Token APIs

    • Add credentials, label, identifier

    • Secure for internal/private usage

    For Detailed Steps,

    Click here


    3️⃣ Triggers

    Triggers define when a workflow starts from your plugin.


    ⚡ Instant Trigger

    Used when your app sends data instantly via webhook.

    • Input Builder

    • API Configuration:

      • Subscribe

      • Sample Data (Perform List)

      • Perform

      • Unsubscribe

      • Transfer Data

    For Detailed Steps,

    Click here


    ⏱️ Scheduled Trigger

    Used to fetch data at intervals (e.g., every 5 minutes).

    • Input Builder

    • API Configuration:

      • Perform

      • Sample Data

      • Transfer Data

    For Detailed Steps,

    Click here

Steps to make Plugins in viaSocket
Aug 1, 2025

viaSocket's Plugin builder allows you to create custom integrations between your favorite apps and the viaSocket platform. This detailed guide will walk you through each step of the process, from initial setup to deployment, ensuring you can create powerful and efficient workflows tailored to your needs.

The Plugin builder in viaSocket is designed to be user-friendly, enabling both developers and non-developers to create custom app integrations. Whether you want to bring a new app into viaSocket or enhance the functionality of an existing app, the Plugin builder provides the necessary tools and flexibility. 

DH Walkthrough
DH Walkthrough

Click through a step-by-step, interactive demo walkthrough of Viasocket, powered by Supademo.

https://app.supademo.com/embed/cmaawnn2x68k113m0ooz7zpda?embed_v=2


The following steps will guide you through creating a plugin in viaSocket.

  1. Visibility Configuration

  2. Authentication

  3. Create Triggers

  4. Create Actions

  5. Define Input Fields

AI Assistance at every step

viaSocket’s AI is designed to make the plug creation process as simple and efficient as possible. At each step, the AI provides valuable support, such as automatically fetching the icon of an app when you provide its domain and recommending most useful triggers and actions based on your needs.

Access the Plugin Builder

  • Navigate to the Developer Hub section.

  • Click on the Plugin Builder option.

  • Once inside the Plugin Builder, select "+Create New Plug" to begin creating your custom plug.

image

1.  Visibility Configuration

This includes choosing a unique and descriptive name, uploading a relevant logo for display in viaSocket's app library, and deciding on the plugin's audience. You can set your plugin to Private, making it available only to your account or organization, or Public, which allows it to be listed in viaSocket's "Integration" library for access by all users.​

Screenshot 2025-03-22 152100.png

2. Authentication

In the authentication step, you determine how users will authenticate their accounts before connecting the app to viaSocket for workflows. This process ensures secure communication between viaSocket and the integrated app. Authentication methods can vary depending on the app:

  • Basic Authentication: Requires users to enter an API key or username and password.

  • OAuth 2.0: Involves providing a client ID, client secret, authorization URL, and token URL for more secure and scalable access.

image

The choice of authentication method depends on the specific requirements of the app being integrated.

3. Create Triggers

Triggers are the events that start workflows .When creating triggers for your plugin, you can choose between two types:

  • Instant Triggers: These use webhooks to initiate workflows instantly when an event occurs in the integrated app.

  • Scheduled Triggers: These use APIs to poll data at regular intervals, such as every 15 minutes, to check for updates and trigger workflows accordingly.

 For example, "New Email Received" in an email app or "New Order Created" in an e-commerce platform.

image

4. Create Actions

Actions are tasks executed in response to triggers within your plugin. They perform specific functions or operations in the integrated app based on the data received from the trigger. 

For example, "Send a Message" in a messaging app or "Update a Record" in a CRM system.

image

5. Define Input Fields

  • Input fields are the parameters that users need to provide to execute triggers or actions.

  • Clearly define the input fields, including their names, data types (text, number, date, etc.), and validation rules.

  • Ensure that all required fields are clearly marked, and optional fields are identified accordingly.

image

Testing and Deployment

  • Test Your Plugin: Before deploying, thoroughly test your plugin to ensure all triggers, actions, and authentication methods work correctly. Use the "Test" feature in viaSocket to simulate various scenarios.

  • Publish Your Plugin: Once your plugin is tested and customized, click "Publish" to make it live. Choose whether to keep it private or make it public on the viaSocket.

Monitor and Maintain: After deployment, monitor your plugin's performance through the viaSocket dashboard. Update and maintain your plugin regularly to fix bugs, add new features, or improve performance based on user feedback.

Creating a plugin in viaSocket is a powerful way to extend the capabilities of your apps and automate workflows. By following this step-by-step guide, you can create robust and efficient integrations tailored to your specific needs, enhancing productivity and streamlining processes. 

How to create Plugins in viaSocket?
Jul 29, 2025

Choose how users will securely connect your plugin to external services.


No Auth

When to use: APIs that require no login or for public data.
Security level: Low.
Recommended for: Non-sensitive, open APIs.


Basic Auth

Use when: Your API expects credentials like an API key or username/password.

  • Configure input fields and request params

  • Add the ME (Test API) endpoint

  • Set the Connection Label (to confirm secure linking)

  • NOTE: Credentials are base64-encoded—not encrypted. Use only over HTTPS.


OAuth 2.0

Recommended for most modern apps. Handles user consent, token refresh, and secure scopes.

Grant Type

Best For

Notes

Authorization Code

Web apps with backend (secure tokens)

Includes refresh token logic

Implicit

Browser apps without refresh token access

Less secure; tokens exposed in URL.

Client Credentials

App-to-app secure access

No user intervention required

Password Credentials

Legacy setups needing direct login

Deprecated in most modern deployments

Each grant includes: Fields setup, redirect/auth endpoints, token/refresh/revoke API, Test (ME) API, Auth Identifier, Connection Label, and Request Params.

Authentication Type

Use Case

Security Level

Recommended For

No Auth

Public APIs, non-sensitive data

Low

Open data access

Basic Auth

Internal services, quick testing

Medium

Internal applications, prototyping

OAuth 2.0

Third-party integrations, secure access

High

Most modern applications


Common Authentication FAQs

Q: When should I avoid Basic Auth?
→ Use Basic only for internal or secure environments. Prefer OAuth when possible.

Q: My Auth fails—what now?
→ Check correct redirect URI, grant type, and ensure tokens refresh correctly. Expose errors clearly in Test API logs.

Q: Are tokens encrypted?
→ viaSocket stores encrypted tokens securely; tokens refresh automatically when configured.

Authentication
Aug 1, 2025

Once authentication is configured, your next step is to create an Action—the task your plugin performs when triggered in a workflow. Actions are responsible for making API calls, sending data, or updating records in the external app.


What is an Action?

An Action defines what your plugin will do in a workflow.

Think of it as:
When this trigger fires → perform this action.

For example:

  • Send a message via an API

  • Create a contact in a CRM

  • Update a record in a database


What You’ll Set Up

Here’s what goes into creating a well-functioning action:

  • Scopes – (Optional) Define what level of access this action requires

  • Input Fields – Let users customize inputs like email, name, message, etc.

  • Action JSON – A structured config for the request: method, headers, body

  • Perform API – The actual API endpoint that carries out the action

  • Output Sample – For mapping results to the next step


Example Scenario

Let’s say you’re building a “Send WhatsApp Message” action:

  • Input Fields: recipient number, message text

  • Perform API: POST https://api.twilio.com/messages

  • Action JSON: Includes headers, body template, auth token

  • Output Sample: response with messageId, status, etc.


Best Practices

  • Use context.inputData.fieldKey to dynamically pass user input

  • Include headers, params, and body in JSON as needed

  • Log or return test responses for easier debugging

  • Keep action names and descriptions clear and user-friendly

Create Action Demo
Create Action Demo

Click through a step-by-step, interactive demo walkthrough of Viasocket, powered by Supademo.

https://app.supademo.com/embed/cm66c44pj02ce1xdhl0c5bjyj?embed_v=2

How to create Actions
Aug 1, 2025

We are excited to invite you to integrate and test your app on viaSocket, a powerful workflow automation tool. 

Steps to Get Started:

  1. Sign Up: Create an account on viaSocket.

  2. Promo Code: Use the promo code provided by us to access premium features.

  3. Test Your Integration:

  • When - Trigger: Test how your app initiates workflows.

  • Do - Action: Test how your app responds within workflows.

For instance, if your app is an email marketing tool, you might test triggers like “New Subscriber” and actions like “Send Welcome Email.”

Detailed Testing Checklist

Testing Triggers

  • Search Your App: Look for your app on our “App Integrations” page. Verify that your app’s name and logo are correct.

  • Select Trigger: Choose the trigger you want to test first.

  • Authentication: Ensure that all triggers have the correct type of authentication.

  • Description: Check the description of each trigger to ensure accuracy.

  • Fields Verification: Verify all the fields in each trigger.

  • API Response: Check the APIs' responses in the response block.

  • Testing Multiple Triggers: You can test all your triggers from the same flow by clicking on “Change” beside the trigger name in the slider. Once authenticated, you can continue with the same authentication.

  • Further Testing: Use any of our in-built tools or your own app’s actions to test further.

Testing Actions

  • Create a Flow: Start with a Webhook or Cron as the trigger. You can also use your own app's triggers.

  • Select Action: Choose the action you want to test first.

  • Authentication: Ensure that all actions have the correct type of authentication.

  • Description: Check the description of each action to ensure accuracy.

  • Fields Verification: Verify all the fields in each action.

  • API Response: Check the APIs' responses in the response block.

  • Testing Multiple Actions: Continue adding all the actions of your app in the same flow. Once authenticated, you can continue with the same authentication.

Providing Feedback and Customization

After you’ve tested your integration, you might have suggestions for improvements or additional Triggers and Actions you want to implement.

Please reach out to us at

[email protected]

with your feedback and requests.

Featuring Your App

We’re committed to showcasing our integrations prominently. Once your integration is verified, we will feature your app on our website at viaSocket Integrations. 

We will also create a dedicated page for your app at viaSocket/integrations/[your_app].

For example,

https://viasocket.com/integrations/emailoctopus

.

Highlighting Popular Use Cases

We know that showcasing real-world applications of your integration is vital. On your app's dedicated page, we will feature popular use cases. We invite you to share with us the combinations and use cases you want highlighted. You can email these details to us, and we will ensure they are prominently displayed.

Promotion and Collaboration

Our promotional efforts extend beyond our website. We actively post about new integrations and popular use cases on social media and include them in our email newsletters. If you have specific use cases you want us to promote, let us know, and we will include them in our communications. Additionally, we can provide you with images and content to share with your own audience.

Final Steps

Once you have completed the testing and verification, we will publish your app on our tool and website.

Thank you for partnering with us. We look forward to seeing the innovative ways in which your app can integrate with viaSocket.

For any queries, feel free to contact us at

[email protected]

.

Let's make automation smarter together! 🚀


Test Your App Integration on viaSocket
Aug 1, 2025